Infant Feeding

Whether you are planning to breastfeed, exclusively pump, or formula feed, it is SO important to have all the information available to you when deciding how you will feed your infant. We can help you find information, troubleshoot issues, and reach your desired feeding goals.
Once baby gets older, you’ll start thinking about introducing foods. And guess what - we have resources for THAT, too!
Articles & Resources
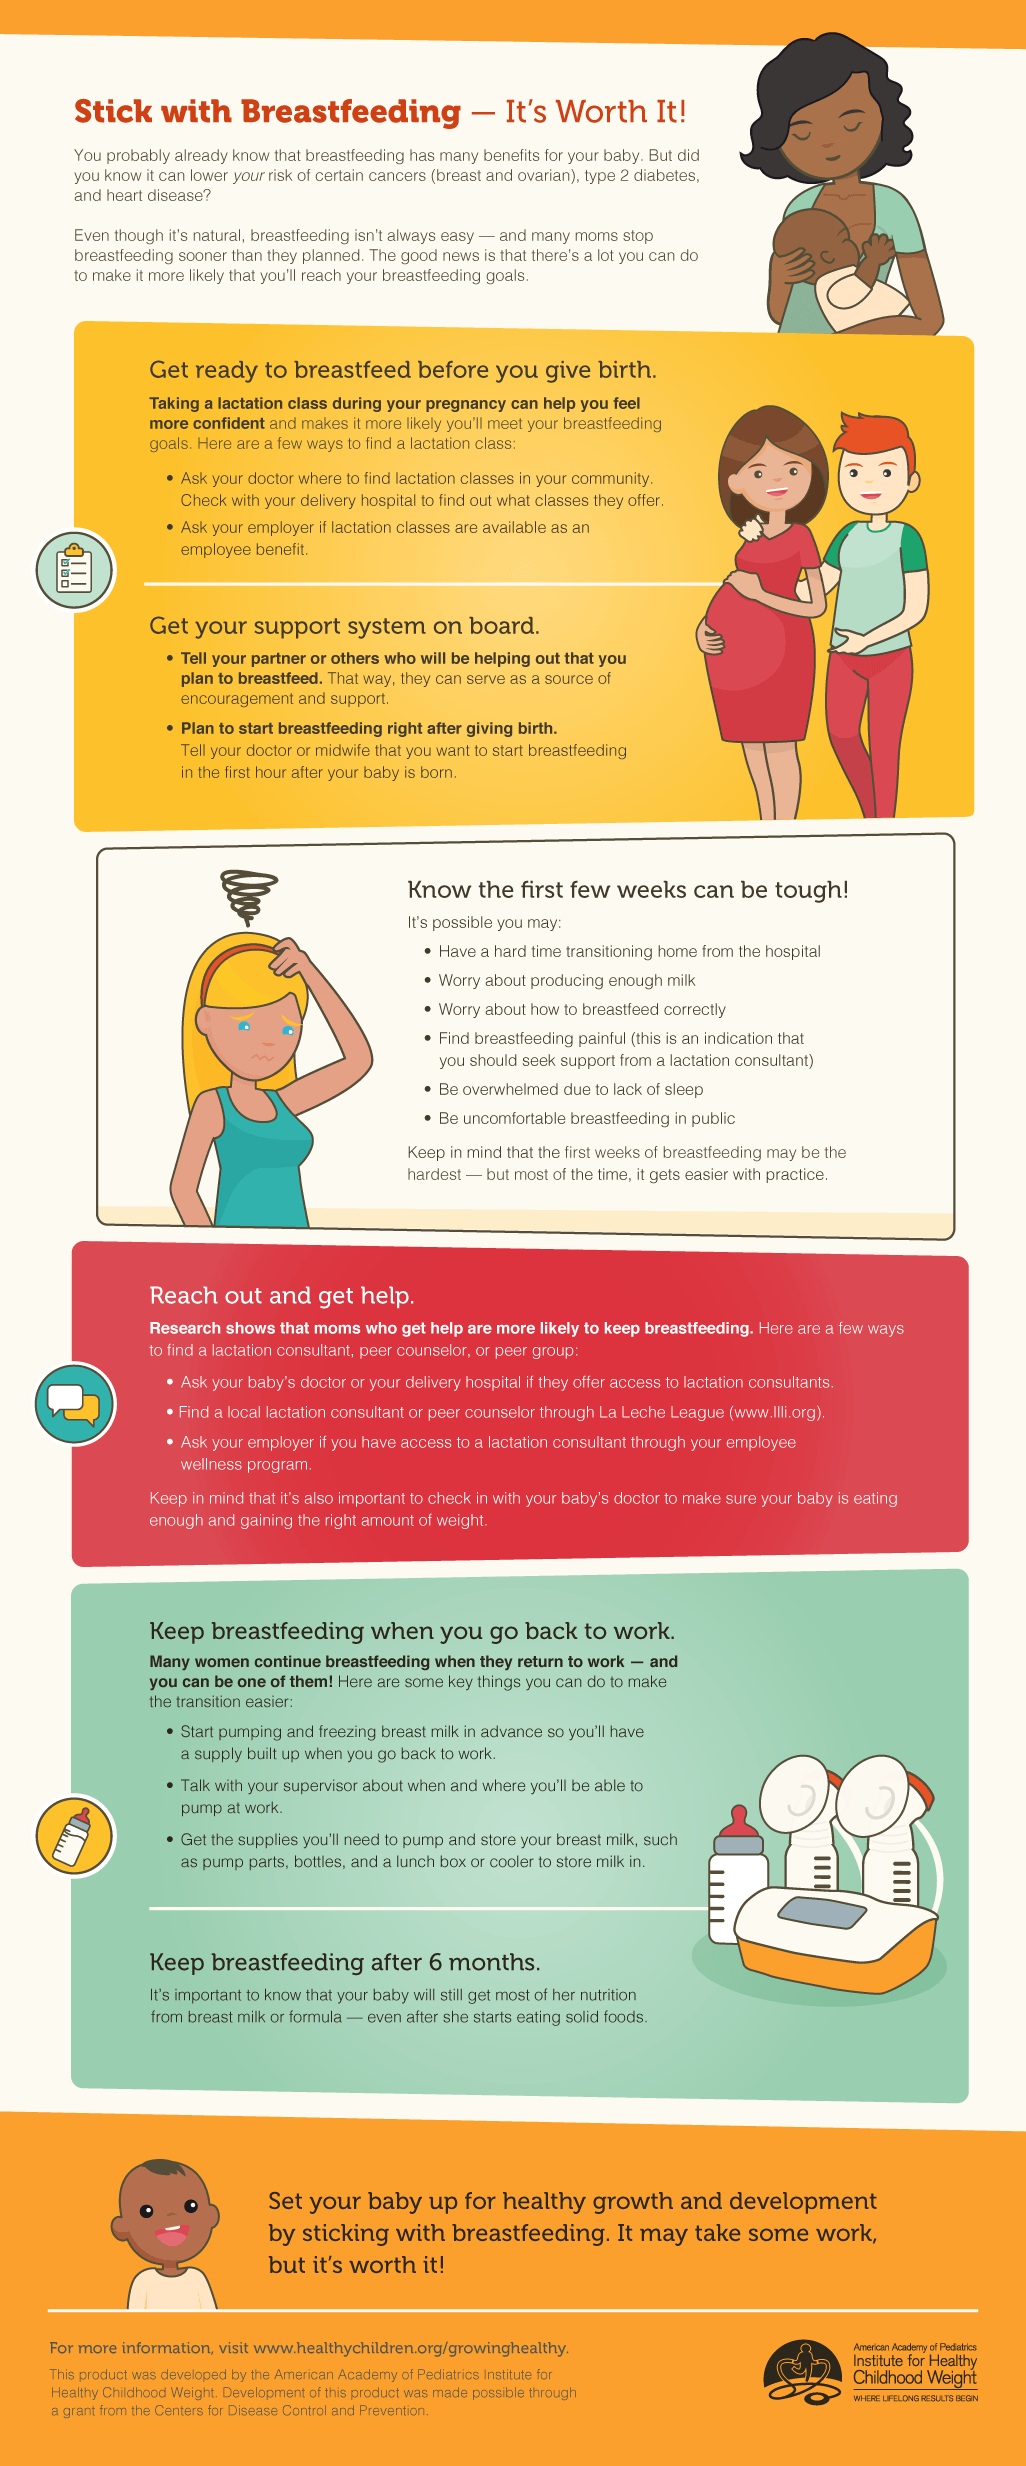
Breastfeeding
Tips, Links, and Tricks to Help You Get a Great Head Start With Breastfeeding.
First, and foremost, breastfeeding SHOULD NOT HURT. I can’t stress this enough. We want to make sure it doesn’t hurt. Proper latch, and positioning is natural, and should not cause you pain. If you have pain, please inform your doula/midwife/staff to get you help before a nipple injury can occur.
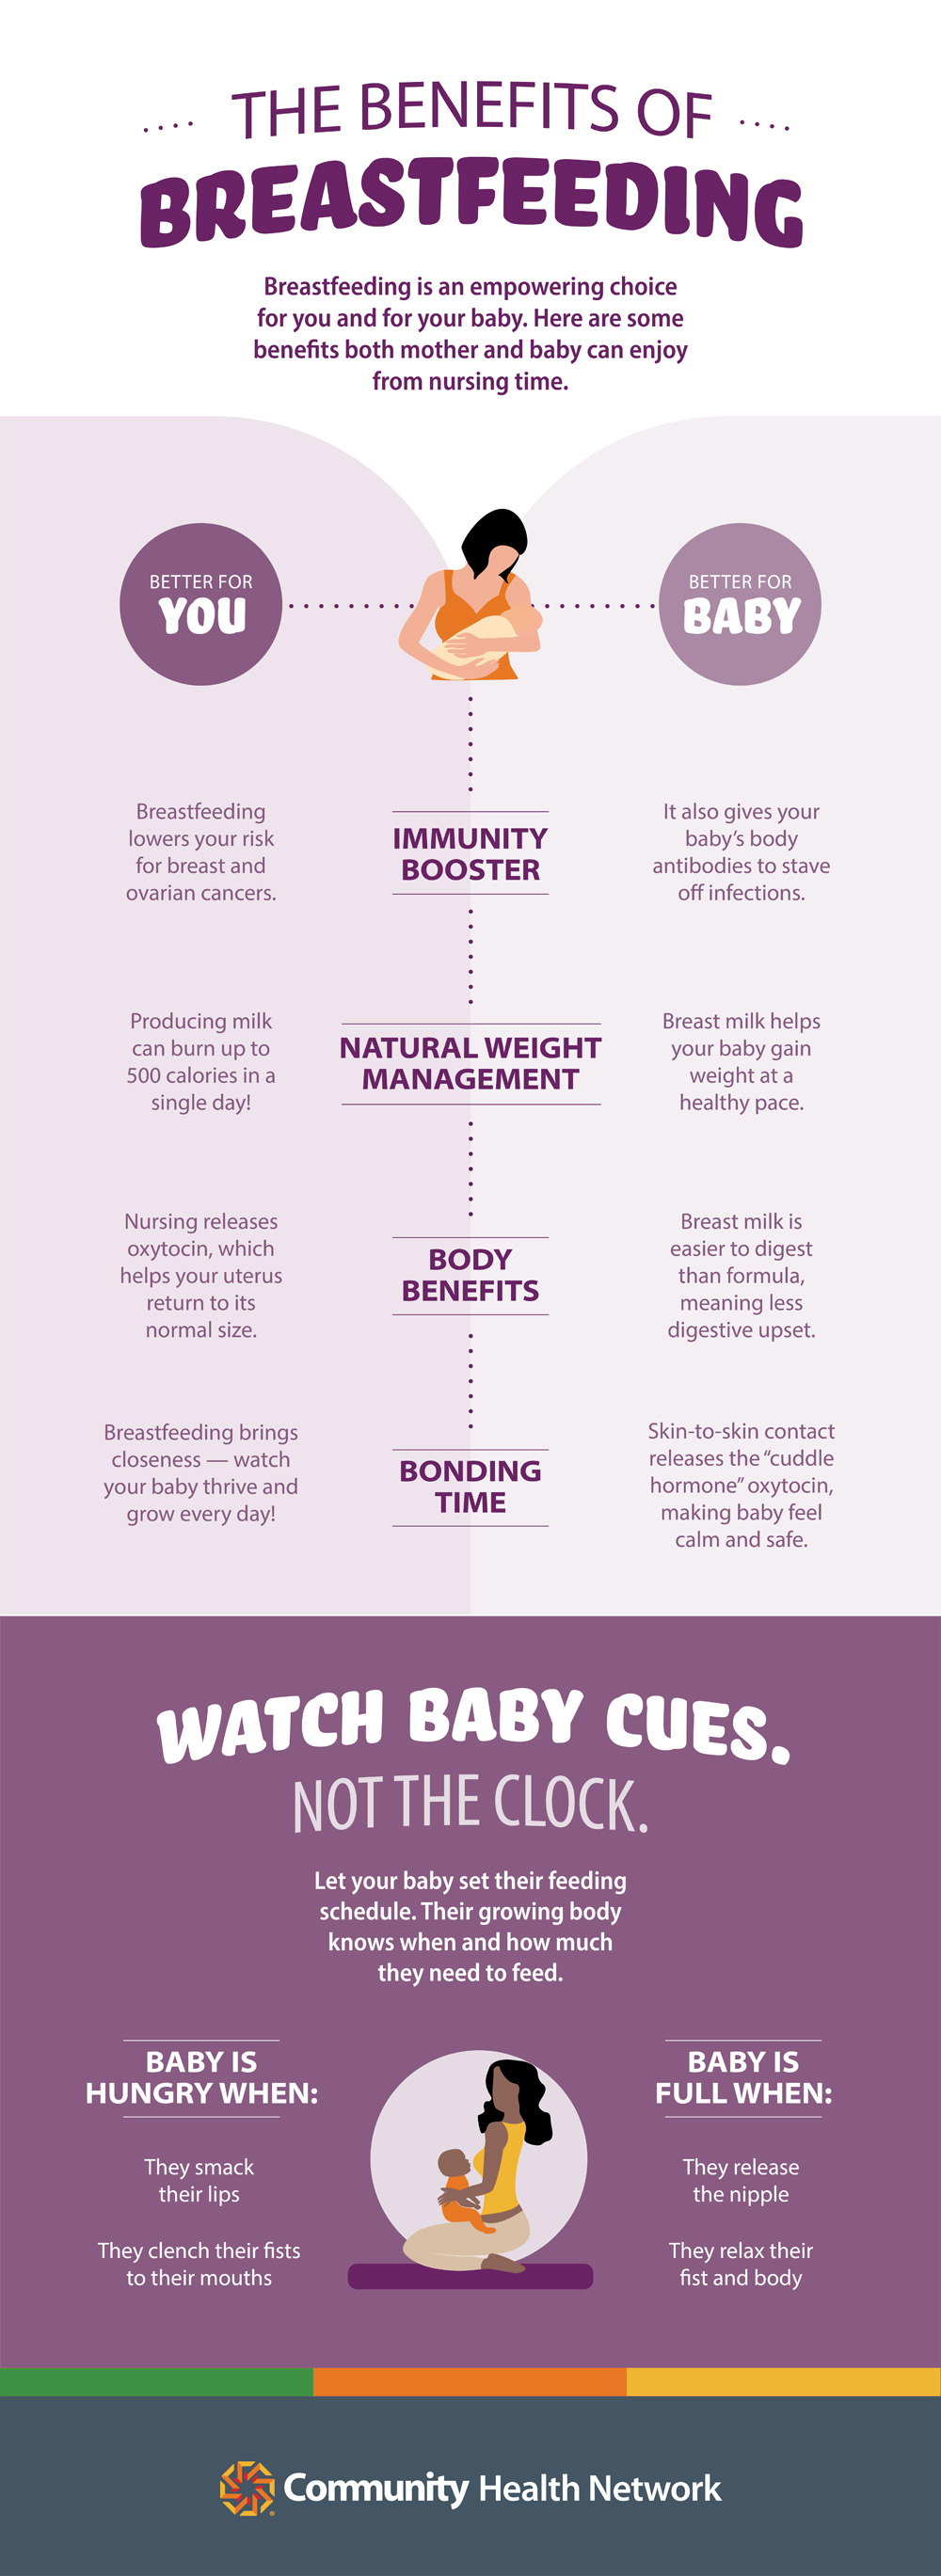
From giving your kiddo's immune system a boost to lowering your risk of ovarain and breast cancer, breastfeeding has many benefits for both baby AND mom!
Visit healthychildren.org for more details.
1. The Birth Cry
- The first stage is the birth cry. This distinctive cry occurs immediately after birth as the baby’s lungs expand.
2. Relaxation
- The second stage is the relaxation stage. During the relaxation stage, the newborn exhibits no mouth movements and the hands are relaxed. This stage usually begins when the birth cry has stopped. The baby is skin to skin with the mother and covered with a warm, dry towel or blanket.
3. Awakening
- The third stage is the awakening stage. During this stage the newborn exhibits small thrusts of movement in the head and shoulders. This stage usually begins about 3 minutes after birth. The newborn in the awakening stage may exhibit head movements, open his eyes, show some mouth activity and might move his shoulders.
4. Active
- The fourth stage is the activity stage. During this stage, the newborn begins to make increased mouthing and sucking movements as the rooting reflex becomes more obvious. This stage usually begins about 8 minutes after birth.
5. Rest
- At any point, the baby may rest. The baby may have periods of resting between periods of activity throughout the first hour or so after birth.
6. Crawling
- The sixth stage is the crawling stage. The baby approaches the breast during this stage with short periods of action that result in reaching the breast and nipple. This stage usually begins about 35 minutes after birth.
7. Familiarization
- The seventh stage is called familiarization. During this stage, the newborn becomes acquainted with the mother by licking the nipple and touching and massaging her breast. This stage usually begins around 45 minutes after birth and could last for 20 minutes or more.
8. Suckling
- The eighth stage is suckling. During this stage, the newborn takes the nipple, self attaches and suckles. This early experience of learning to breastfeed usually begins about an hour after birth. If the mother has had analgesia/anesthesia during labor, it may take more time with skin to skin for the baby to complete the stages and begin suckling.
9. Sleep
- The final stage is sleep. The baby and sometimes the mother fall into a restful sleep. Babies usually fall asleep about 1½ to 2 hours after birth.
References
How long should I breastfeed my baby? How do I gt my baby to latch? Can I have caffeine while I'm breastfeeding?
- See answers to these and more commonly asked questions here.
You can hand express 14 drops of colostrum onto a spoon every 1-2 hours, the first 24 hours, and baby will be good with that, and their blood sugar will stay sustained if they are having issues latching.
Here is how to attach silicone manual pump on the breast you aren’t feeding from, on day 3 or 4 once your milk changes from sticky colostrum to a flowy, easier to remove milky consistency.

When you are breastfeeding AND pumping, the output is not likely to be high. When you are pumping in place of feedings, the output will be higher.

Are you stressed about making a freezer stash? Here is a comforting image of what an average stash looks like!

Watch the video here.
Notice how the parent holds the baby’s back and shoulders for support. By not pushing baby’s head to their breast, they allow baby to have space to incline their head a bit. This helps baby be able to obtain a deeper latch, instead of moving their jaw up and down on the nipple. They instead can draw the nipple to the soft palate, and create a rocking motion.
Watch the video here.
Natural breastfeeding positions can make early breastfeeding easier.
Watch the video here.
How gravity, gaps, and gaze can simplify easrly breastfeeding.
Kellymom.com is a WONDERFUL site for all things related to infant feeding.
From the homepage you can search for any questions you have. We love Kellymom!
Alternatives to Exclusive Breastfeeding
It cannot be stressed enough that the amount of milk you able to pump is NOT ever a reliable indicator of how much milk you are producing, nor how much milk baby is taking in. The healthy breastfed baby is usually much more efficient at getting milk from the breast than a pump is.
What is Pumping?
- Pumping is when a mother expresses milk from her breast to store and feed to her child at a later time. Many working mothers send milk to childcare with their infant, and pump more milk while at work.
- Milk may be expressed by hand, by manual pump, silicone pump, or electric pump.
- While not all mothers need to pump due to returning to work, it is recommended to have a small freezer stash (even if it's just a bag or 2), just in case you ever end up away from baby for longer than anticipated.
What is Exclusive Pumping?
- Exclusive pumping is when you express breastmilk to feed your baby from a bottle, rather than directly from the breast. There are many reasons a mother may choose this option, whether physical, mental, or situational.
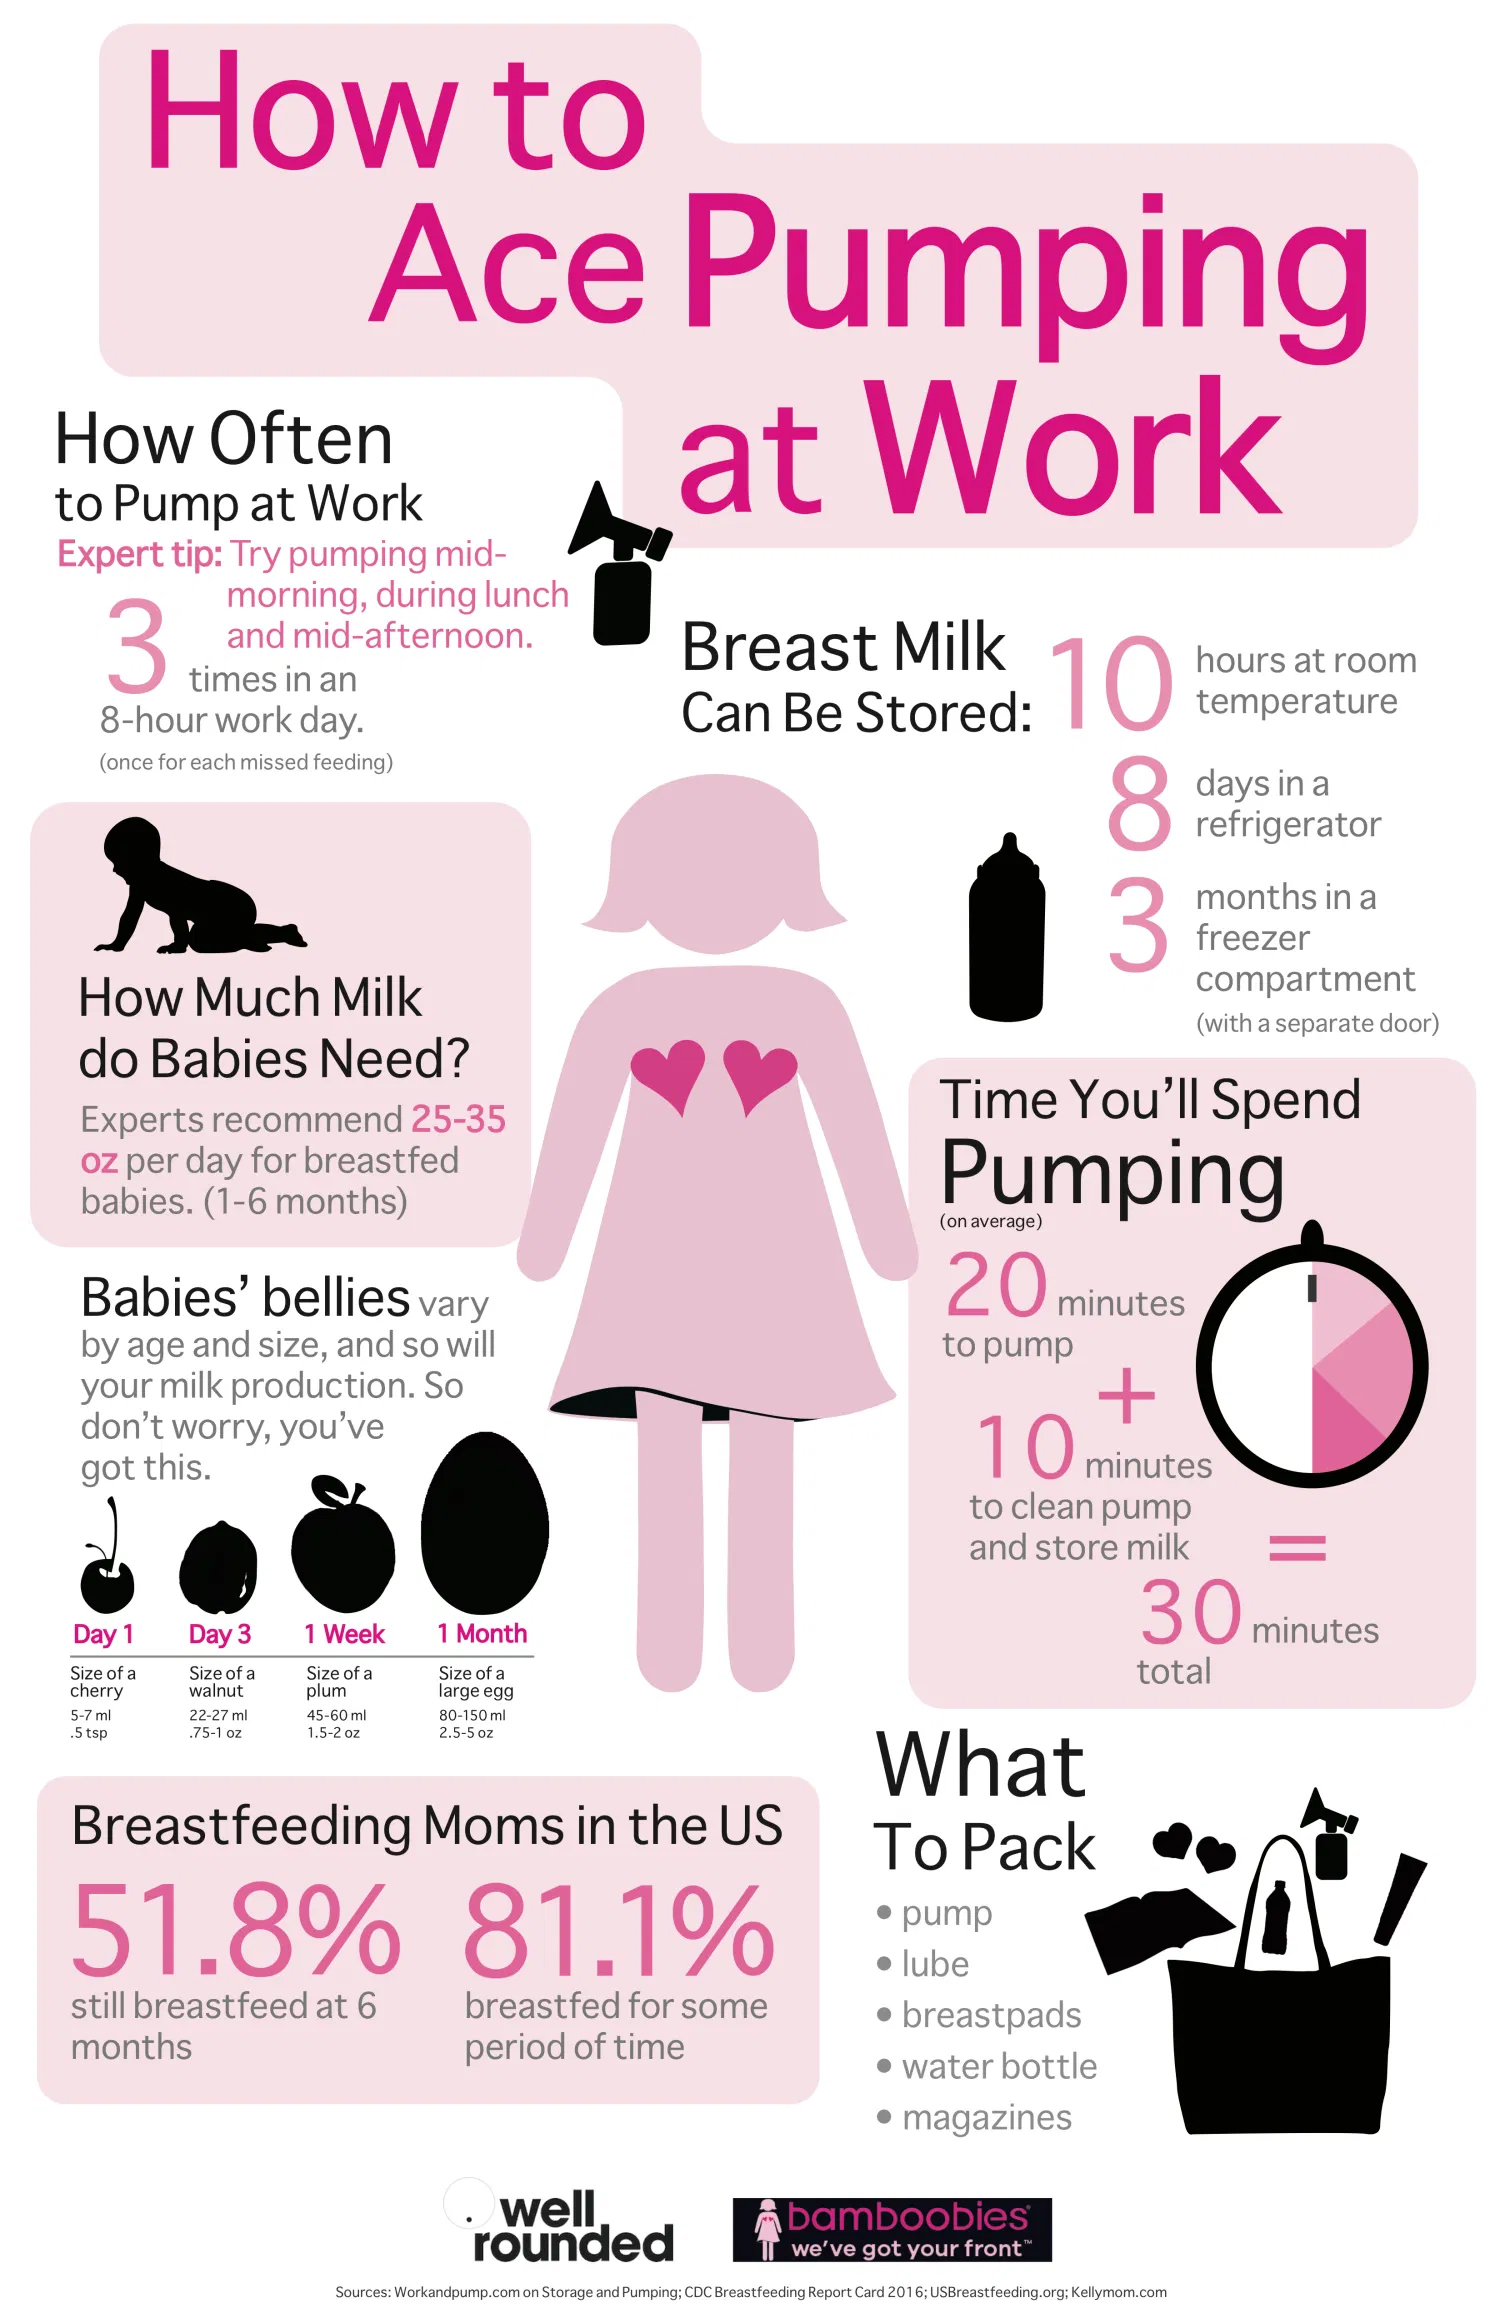
How often and when to pump?
- Ideally, pump when the baby would normally eat, or every two hours. Try not to go more than three hours between pumping sessions.
- If you are exclusively pumping, pump around the clock for the first few weeks to help establish milk supply.
- The more frequently the breasts are emptied, the more milk the mother should produce.
How long to pump?
- Most experts agree on pumping for at least 15 minutes, but not longer than 20.
- Pump for about 5 minutes past when milk stops flowing quickly. This can help trigger another letdown, collecting more milk, and helping to increase supply.
About pumping
- Pumping shouldn't hurt! Read the instructions for your pump, and look up YouTube videos for tips about your specific model.
- Each woman is different, so the exact settings of the pump may vary. Experiment with different settings until you get into a good rhythm. You may need a lower setting than you'd expect!
- Use the lanolin! Not only will it help protect the nipple tissue, it can also help improve the suction by helping the flange seal to the breast.
How much milk?
- Breastfed babies often take less milk in the bottle than formula fed babies, because breastmilk changes with the baby to meet their needs, increasing in nutrient load as the baby ages. Many infants take in 2-4oz per bottle all through breastfeeding, regardless of age.
- Current research indicates infants drink approximately 25oz of breastmilk daily from 1 to 6 months old.
- To estimate how much milk a baby will need per feeding, divide 25 by the number of times the baby nurses or feeds. Example: if baby nurses about 8 times a day, then you'll need about 3oz per feeding every 3 hours, or about an oz per hour.
- Visit a breastmilk calculator here.
How to feed baby?
- Do NOT heat breastmilk in a microwave. Heat by running warm water over the milk storage bag or bottle.
- Baby should be fed on demand. Newborns may eat more frequently than older babies, but will eat less at a time.
- Use newborn or premie size nipples. This will more accurately mimic the flow of milk from the breast, so the baby does not take in too much at once and cause their stomach to overextend.
- Use Paced Feeding - let the baby drink, burp them, change position slightly, back to feeding. This also helps them regulate their intake and not eat too quickly. A normal nursing session takes 15-20 minutes, so let baby take their time with the bottle.
- Get Skin-to-skin with baby! Skin-to-skin is a wonderful tool, and not just for exclusive breastfeeding. Getting skin-to-skin with baby helps regulate their breathing, heart rate, and nervous systems.
- Make eye contact with baby. Let feedings be a bonding time, no matter the method of feeding. Newborns can see roughly 12 inches away - the common distance to their mother's face when feeding.
How to increase milk output?
- Pump more frequently.
- Pump for 5 minutes past the milk flow slowing to trigger another letdown.
- Try a Power Pumping session in place of one regular session.
Pump for 20 minutes.
Rest for 10 minutes.
Pump for 10 minutes.
Rest for 10 minutes.
Pump for 10 minutes.
Know your rights!
- Employers are required to provide mothers with a safe, clean, private space to pump for at least baby's first year.
- A BATHROOM IS NOT AN ACCEPTABLE SPACE.
- Visit mamava for more info about Missouri breastfeeding and pumping laws.
For further reading:
Where to get donated breastmilk?
- The only officially recommended way to get donated breastmilk is to purchase it through a milk bank. You can find information on that here.
- Many mothers choose to accept personal donations from local mothers, either from friends or through online groups such as those listed below.
Human Milk 4 Human Babies - Missouri
Eats on Feets - Missouri
Eats on Feets - Illinois
Human Milk 4 Human Babies - Illinois.
Things to consider if accepting personal donations.
- Do you know any health or lifestyle information about the donor that could potentially impact the use or safety of their milk. For example, if your child has a dairy allergy, you will want to get milk from a dairy-free mother.
- Does the donor use tobacco, alcohol, drugs, supplements, medications, etc., that could be present in the milk?
- Do they safely collect, store, and transport the milk?
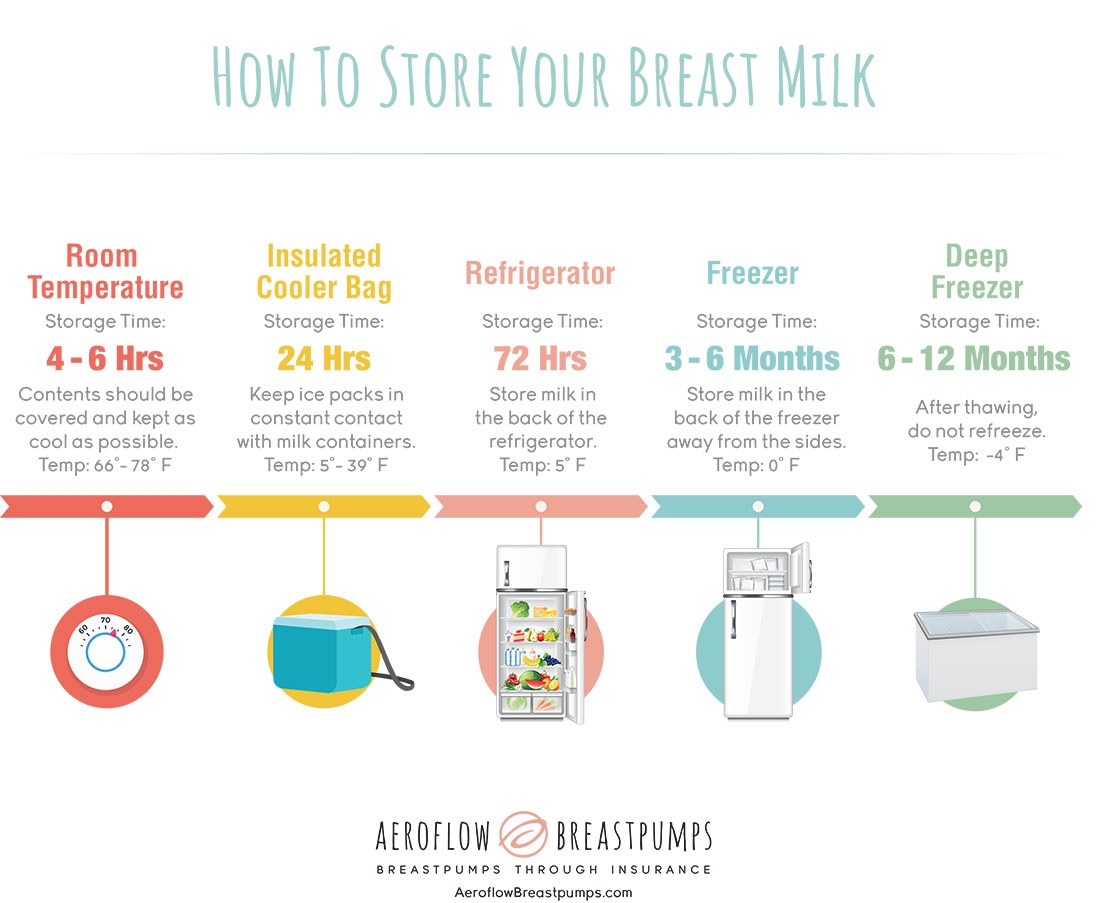
How to store donated breastmilk?
- Ideally you will receive frozen milk, in which case you should put it into the freezer until you are ready to use.
- If it has been previously frozen and is now thawed, it is not recommended to refreeze it.
- If it was freshly pumped and not yet frozen, put it in the freezer until you are ready to use it.
- Deep freeze is preferred to fridge freezer when possible.
How to use donated breastmilk?
- Thaw donated breastmilk by running warm water over the bag.
- Do NOT heat in the microwave.
- Check out these safety considerations for using donated breastmilk.
What is an SNS?
- A Supplemental Nursing System allows baby to receive pumped milk or formula WHILE feeding at the breast.
- While there are a variety of models available, the Medela system is the most widely known one in the U.S.
Why use an SNS?
- Baby receives the supplemental milk WHILE nursing at the breast, which allows the mother's body to still receive all the correct physical signals to produce more milk.
- Helps to avoid nipple confusion for young babies.
How to use an SNS?
- The milk or formula is delivered via a thin tube that goes alongside the nipple, so the baby latches to both.
- Read full instructions here.
For more info, visit
Some breastfeeding mothers may need to supplement due to a variety of reasons. If you are going to supplement with either pumped breastmilk (your own, or donated milk) or formula, there are some important things to consider.
- Talk to your doctor and lactation consultant before supplementing. Make sure there is a NEED to do this. Babies are very efficient at milk removal; often mothers see low pump output and believe that their supply is low, but many times it is just their body responding differently to the pump. Pumping is NOT a good indicator of your milk production.
- Often times formula is "thicker" than breastmilk, and so it may be easy to think that it is richer and more calories, but that is not the case. Formula is thicker because it is a solid powder suspended in water, but it offers the same calories as an equivalent serving of breastmilk.
- Babies go through phases of cluster feeding, mental leaps, and growth spurts - all of which can increase their demand for nursing. These are NORMAL, and are not an indication that your supply is low.
- It can be tempting to supplement or "top up" because breastmilk seems to "go through them (babies) so fast." This is because it is easily digestible, and babies are built to use it. Formula is more difficult to digest, which makes it take longer, and therefore it may mean that baby goes longer between feedings, but it does not mean that it was "more filling" or gave them more nutrients.
- Beware the Top Up Trap. Being able to supplement is a wonderful tool when necessary. But if you intend to continue breastfeeding, you need to make sure to protect and maintain your supply as well.
-

- If you are feeding your baby a bottle whether of breastmilk or formula, make sure to pump at that time as well, to help maintain your supply.
- To be clear - if you need to supplement, then we are thrilled that technology has advanced to the point where you can safely feed your baby alternatives to breastmilk. We just want to encourage you to speak with a lactation specialist to help determine if there is a NEED to supplement if you are intending to continue breastfeeding.
- PLEASE consult a doctor AND lactation specialist before beginning to supplement.
For mothers who choose not to breastfeed, or who are unable, we are fortunate to have the option of infant formula. There are many choices, and many things to consider. See below for information regarding formula selection, how to prepare and store, and how to feed a baby formula.
Explore the below links to learn some important information about feeding your baby infant formula:
There are several options for serving milk or formula to babies, especially for babies who are breastfed at least part of the time. Check out the links below for more information!
- Cup Feeding
- Syringe Feeding
- Spoon Feeding
- Supplemental Nursing System (details in SNS section above)
Breastfeeding Guide for Dads
Don't rush mom or baby.
- Don’t rush mom or baby (in the short-term or long-term) so that life can get back to "normal." (Normal will have a new definition every 6 months for the next few years, anyway!)
- Breastfeeding is natural, but doesn't always come easily. Often moms and babies need several days to get in the groove.
Learn about the benefits of breastfeeding for mom, baby, and the whole family.
- Baby - food that is specifically designed FOR baby. Easily digested, and helps prevent illness better than any other feeding option.
- Mom - helps fight off ovarian and breast cancers, often helps with postpartum recovery and weight loss, and helps protect against postpartum depression.
- Family - lower cost, less space, and less time. No need to buy formula, mix bottles safely, shop for special formula if baby has a sensitive stomach, or to lug around bags full of bottle supplies.
It can take a while to get the hang of breastfeeding, and you can be really helpful during this time!
- Be supportive. Let her know she's doing a great job.
- Keep her well fed and well hydrated. Keep a snack basket handy!
- Understand that it is a process, and DON'T say things like, "the baby's eating AGAIN?!"
- Understand that while her bosom likely looks delightful right now, she probably won't want any extra attention in that department for quite some time, and that's OK. The baby won't go off to college still breastfeeding.
- If she's in pain or discomfort, help find a lactation specialist to talk to. Breastfeeding SHOULDN'T hurt, and early help can be crucial to its success.
Lip and Tongue Ties
Tongue ties can affect breastfeeding negatively by limiting the proper movement of the infants mouth so they cannot properly nurse.
If an infant cannot move their tongue and mouth freely, they may experience any of the following:
- May not be able to latch on the breast, or may have poor latch
- May breastfeed non-stop in an effort to get enough milk (note, cluster feeding is COMMON in all infants, so if this is the only symptom, then cluster feeding is most likely the cause)
- Poor weight gain
A mother’s symptoms are often uncomfortable, and if unresolved, may lead to her ending breastfeeding sooner than she desired. Symptoms may include:
- list items go between these li tags
- Pain during feeding sessions
- Nipple getting compressed, may look like “lipstick” at the end of the feed
- White stripe across the tip of the nipple from compression
- Low milk production or blocked ducts due to poor milk removal
- Oversupply due to frequent nursing for baby to get enough milk
If the infant cannot extend or lift their tongue, or if it becomes misshapen during movement, this may indicate a tongue tie. You may be able to see or feel tissue under the tongue restricting movement. A visit to a lactation consultant or pediatric dentist is the best way to confirm the existence of a tie, and they can help you decide the best way to treat it. Ties are often the most visible sign of body and fascia restrictions that can lead to difficulty moving, problems with breastfeeding, tooth decay, and may even impact speech later.
List of pediatric dentists coming soon.
Infant Nutrition
Breastfeeding is (in most cases) the best option for feeding an infant. The number on obstacle to breastfeeding is not usually a woman's own body - it's the support and knowledge (or lack there-of) of those around her. Having accurate, up-to-date information and ample support from family, employers, and healthcare professionals makes the process much easier. Check back soon to see our guide for more information. In the meantime, there are links below for more breastfeeding subjects.
When breastfeeding is NOT an option, there are a variety of options available. See below for Formula Feeding information, and check back soon for our alternatives guide.
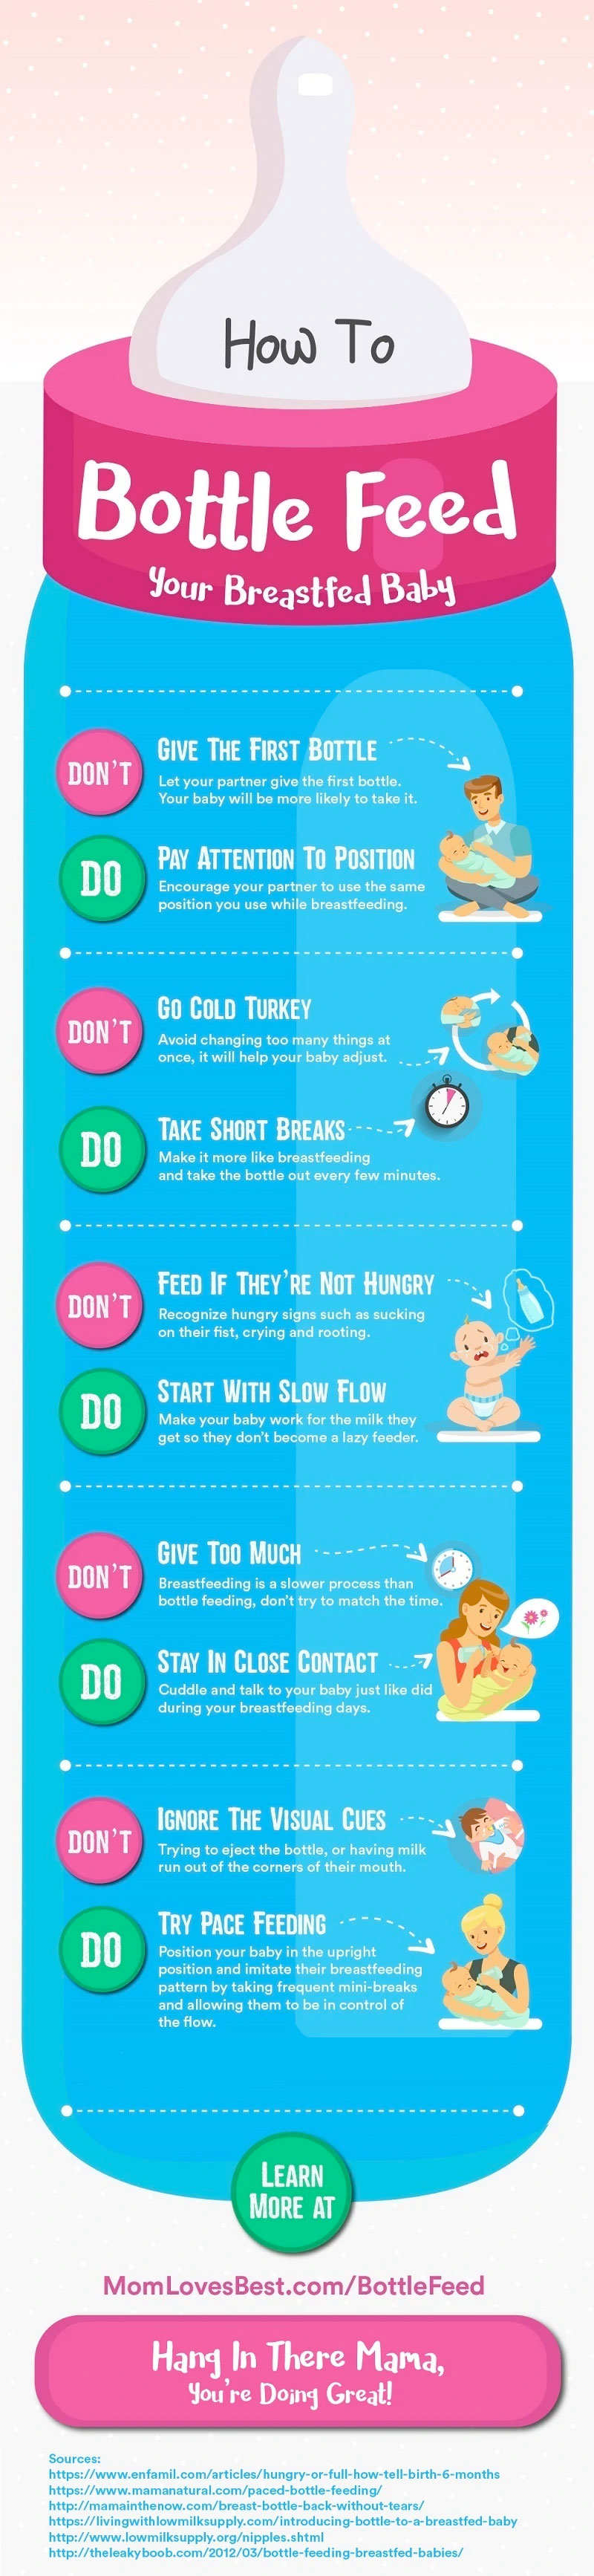
Tips for bottle-feeding
- Pick a time when your baby is calm and not too hungry or full
- Start by offering small amounts of breast milk or infant formula in the bottle. You can offer more if he/she is showing signs of hunger until you figure out how much your baby usually eats in a feeding
- If you are breastfeeding, your baby may be more willing to take a bottle from someone other than you.
How to bottle-feed:
- Position the bottle at an angle (not straight up & down) so milk only comes out when your baby sucks
- Let your baby take breaks from drinking when they seem to want them
- Stop when your baby cues that they are full, even if the bottle is not empty
- Get Skin-to-skin with baby! Skin-to-skin is a wonderful tool, and not just for exclusive breastfeeding. Getting skin-to-skin with baby helps regulate their breathing, heart rate, and nervous systems.
- Make eye contact with baby. Let feedings be a bonding time, no matter the method of feeding. Newborns can see roughly 12 inches away - the common distance to their mother's face when feeding.
Other tips:
- Give your baby only breast milk or infant formula in a bottle
- Hold your baby close when you feed him or her a bottle
- Do not prop or leave the bottle in your baby’s mouth. This can increase your baby’s risk of choking, ear infections, and tooth decay
- Do not put your baby to bed with a bottle
- Do not force your baby to finish the bottle
- Don’t put cereal or other food in a bottle (choking hazard)
- Keeping your bottle feeding supplies clean is very important to keep germs from getting into the milk or formula - Learn more about how to clean your feeding supplies.
Explore the below links to learn some important information about feeding your baby infant formula:
When your child is about 6 months old, you can start introducing him or her to foods and drinks other than breast milk and infant formula - sometimes called complementary foods.
Between the first and second year, your child will develop the skills needed to participate in meals with the family. By 2 years old, your child will be able to eat most of the same foods as the family. Explore the pages below to learn more:
Your infant (0-5 months) may be hungry if he/she:
- Puts hands to mouth.
- Turns head towards breast or bottle.
- Puckers, smacks, or licks lips.
- Has clenched hands.
Your infant may be full if he/she:
- Closes mouth.
- Turns head away from breast or bottle.
- Relaxes hands.
Let your child decide how much to eat - they do not have to finish all the food on the plate or drink all the liquid in the cup/bottle.
- Having a routine can help children know what to expect when it is time for meals or snacks.
- Wash your child’s hands before mealtime.
- Sit your child in a safe place (high chair or booster seat)
- Watch children at all times to make sure they are safe.
- Face your child toward you or other family members at the table.
- Limit distractions (TV, videos, cell phones, pets) from both you & your child.
- Sitting down as a family for mealtime can teach your child how to eat and helps your child develop social skills.
- Model healthy eating and offer healthy food options at each meal
- Talk with your child during mealtimes
- Mealtimes do not have to be long - they can last 10 or 15 minutes sometimes
- As children get older, they will develop different skills to help with mealtimes. Learn more about when children will begin to use their fingers, spoons, forks, and cups.
Toddler Nutrition
At age two, your child:
- Should be eating 3 healthy meals a day plus 1-2 snacks
- Can eat the same food your family does
- Should be able to use a spoon
- Can drink from a cup with just one hand
- Feed themselves a wide variety of finger foods
- Is still learning to chew and swallow efficiently
- Can become an active participant at family mealtimes
Make sure your toddler eats from each of the basic four food groups each day:
- Meat, fish, poultry, eggs
- Milk, cheese, and other dairy products
- Fruits and vegetables
- Cereals, potatoes, rice, flour products
- Hot dogs (unless cut in quarters lengthwise before sliced)
- Chunks of peanut butter (can be spread thinly on a cracker)
- Nuts, especially peanuts
- Raw cherries with pits
- Round, hard candies
- Gum
- Whole grapes (cut into quarters)
- Whole cherry tomatoes (cut into quarters)
- Marshmallows
- Raw carrots, green beans, celery
- Popcorn
- Seeds (pumpkin, sunflower)
- Large chunks of any food; meat, potatoes, fruits, raw vegetables
Your 6 to 23-month-old may be hungry if he/she:
- Reaches for or points to food
- Opens his or her mouth when offered a spoon or food
- Gets excited when he or she sees food
- Uses hand motions or makes sounds to let you know they are still hungry
They may be full if he/she:
- Pushes food away
- Closes his or her mouth when food is offered
- Turns his or her head away from food
- Uses hand motions or makes sounds to let you know they are full
Vitamin supplements are rarely necessary for toddlers who eat a varied diet. Supplemental iron may be needed if your child eats very little meat, iron-fortified cereal, or iron-rich vegetables.
Your toddler should drink 16 ounces of low-fat or nonfat milk each day for adequate calcium for bone growth
- More than 32 ounces of milk per day may interfere with the proper absorption of iron
- The American Academy of Pediatrics recommends that children stay on whole milk until they are two years of age
Do not fixate on amounts, but instead healthy food choices.
Avoid making mealtime a battle - the more you struggle with your child over his or her eating preferences, the more determined they will be to defy you.
Offer a variety of foods and leave the choices up to your child, it will allow him or her to eat a balanced diet on their own.
Let your toddler feed themselves when possible, and offer soft finger foods instead of ones that require a fork or spoon.
Baby-Led Weaning
First coined by Gill Rapley & Tracey Murkett in their book Baby-Led Weaning: The Essential Guide to Introducing Solid Foods, Baby-led weaning is an approach to introducing solid food where the baby is allowed and encouraged to self-feed solid finger foods instead of receiving purées via spoon. It is a natural exploration of food, led by your baby.
BLW babies:
- Are encouraged to join the family at mealtime and self-feed appropriate finger foods
- Choose what, how much, and how quickly to eat
- Are given the freedom to explore new tastes & textures without the pressure to eat a specific food or amount
- Continue to nurse or receive a bottle just as often
For Babies
- Self-regulation and self-selection with food
- Early experimentation with a variety of healthy foods, which may improve food choices later in life
- Promote hand-eye and fine motor skills
- Learning how to safely handle food (chewing then swallowing)
- Manage different textures, tastes, sizes, and shapes of food
For Parents
- Your baby eats what you eat, so it’s much easier than pureeing a separate meal
- You can eat at the same time and enjoy your warm meal
- You raise a less picky eater
It is highly recommended you wait until your baby is at least 6 months old to begin baby-led weaning. Before 6 months of age, babies' digestive systems and hand-eye coordination are not yet developed enough.
Your baby is also likely ready for BLW if they:
- Can sit up unsupported in a highchair
- Have good neck strength & can keep their head up
- Have lost the tongue-thrust reflex (automatically pushing solids out of the mouth with tongue)
- Are reaching out & grabbing foods
- Are chewing even if they have no teeth
- Have developed the pincer grasp (baby picks up food between thumb and forefinger, not palm and fingers)
Contact Ellen Gipson, the local BLW expert, if you have any questions!
Really all you need is a baby and soft, solid, healthy foods! But, these items can certainly help:
- A highchair that is easy to clean & can be pulled towards your dining table
- A catch-it-all long-sleeved bib – bibs with long plastic sleeves that also have a pock on the front
- Baby spoon and fork – for pre-loading messy foods
- Suction bowl – as your baby progresses with weaning you will want to put food in a bowl rather than the highchair tray
Commit to the process
Families trying BLW are encouraged to make family mealtime a habit, especially since babies learn best by observation and imitation. Plus, the baby feels included, and mealtime is a fun experience rather than a battle.
Continue giving your baby milk - Breast Milk is the only food/drink a baby needs for the first 6 months of life. Formula is the only alternative to breast milk and should be the only drink you give your baby until they are 1 year old.
From birth to 6 months, milk provides your baby with 100% of all of their nutritional needs. From 6 months to 12 months – baby gets 75% of nutrition from milk 25% from food. When introducing solid food:
- Breastfed babies - continue to breastfeed on demand. Feed your baby approx. 60-90 minutes before offering solid food
- Bottle-fed babies - 210ml beaker 3 times/day (roughly)
Prepare food according to your child's age - At 6 months your baby will not have developed the pincer grasp (picking up food with their index finger and thumb). Once they do, you can start introducing things like squished blueberries, peas, squashed beans, etc.
Keep food soft - You should be able to squash food between your finger and thumb to give it to a baby without teeth.
Baby’s first solids should be a selection of “finger foods” that include fresh fruits, soft-cooked vegetables, healthy carbohydrates, proteins, and fats.
The Best First Foods for Baby-Led Weaning
Fruits
- Banana
- Very ripe peaches, pears, plums, and melon
- Soft cooked apples
Vegetables
- Roasted butternut squash
- Steamed broccoli florets
- Potato spears
- Pumpkin
- Green beans
- Roasted peppers (skins removed)
- Avocados
- Sweet potatoes
- Soft cooked carrots, cauliflower, and beet spears
Protein & Meats
- Egg yolk or made into an omelet and sliced
- Mashed chickpeas
- Thinly shredded roasted chicken (preferably the brown meat)
- Hummus spread on veggie spears
- Homemade meatballs or burgers
- Liver
- Beef strips
- Salmon
- Mackerel
Dairy
- Yogurt on a preloaded spoon
- Goat cheese balls
Herbs & Spices
Giving Your Baby Meat
Meat is a great source of protein, iron, vitamins, and minerals. A serving size of meat is about the size of your pinky finger for a baby 6-12 months old.
- Slow cook meat – The slower you cook meat, the more tender it will be
- Make mini burgers – Make patties roughly the size of your baby’s palm
- Shred meat – take a fork and back fork to create safe, shredded meat for your baby
- Meatballs – Make meatballs the size of a golf ball so it is easy for your baby to grab
- Give your baby brown/darker meat whenever possible (higher in Iron)
- Ensure meat is never rare or undercooked
Giving Your Allergen Foods
- Give allergen foods from 6 months – Early exposure may help reduce the risk of developing a food allergy
- Always start introducing allergens when your baby is well
- Introduce one allergen food at a time – giving multiple at once can make it difficult to know which one is causing issues
- If there’s no reaction to the food, continue giving the food to your baby at least 2x/week
- Wait approx 1 week before introducing the next allergen
The most commong major food allergens are:
- Celery
- Cereals containing gluten
- Crustaceans (prawns, crabs, lobsters)
- Eggs
- Fish
- Lupin
- Milk
- Mollusks (mussels, oysters)
- Mustard
- Peanuts
- Tree nuts
- Sesame
- Soybeans
- Sulfur dioxide and sulfites
- High choking risk foods like grapes, cherry/grape tomatoes, nuts, whole hot dogs (full list here)
- Added table salt or sugar
- Don’t let your baby get too hungry - Nurse or bottle-feed up to an hour before offering solids
- Embrace the mess - many parents find a naked baby is easiest to clean up afterward
- Don’t cut food too small - serve pieces of food large enough for the baby to grasp easily
- Rolling pieces of food in oat flour can make pieces easier for the baby to hold
- Make food soft enough - should be able to be smashed between your finger & thumb
- Start with savory foods (non-sweet)
- Give your baby a variety of foods
- Never rush your baby - to keep your baby safe it is important that you are present and not rushing
- Don’t overload your baby’s plate/tray - Too much food will overstimulate your baby
- Start slow & learn your baby’s cues - Begin offering solids once a day, and gradually increase as they show they want or need more.
- Cut fruits & veggies into long thick, french-fry sized spheres - Lay flat on a baking sheet lined with parchment paper, then drizzle over a small amount of olive oil. Roast at 250ºF for about 30 minutes or until soft.
Choking Vs. Gagging
Close supervision when your child is eating is a must, as choking is a real concern with any supplemental feeding. All parents should understand the signs of choking and know how to respond. It’s equally important that only the baby puts food into their own mouth.
Gagging is a safety mechanism that safeguards against choking by bringing large pieces of food forward to be chewed. As baby grows, this place in the mouth moves further back towards the throat. Baby-led weaning helps babies learn to chew and swallow when this reflex is still very close to the front of the mouth. Gagging will subside as your baby gets better at eating.
If a baby is gagging, they will:
- Be quiet or silent
- Have trouble coughing, or won't cough at all
- Have trouble breathing
How do I know my baby is getting enough to eat?
- Your baby is getting enough to eat if they are gaining normally and thriving.
- Baby-led solid feeding trusts that baby knows when they are hungry, full, and what is required to meet nutritional needs.
- If your baby is struggling with low weight, you can try adding in smoothies, purees, or extra fats like avocado and butter.
Will My Baby Get Enough Iron Without Iron-fortified Baby Cereal?
- Yes, if they are breastfed. The iron in breastmilk is absorbed at 50-70%, while the iron in iron-fortified cereal is absorbed at 4-10%. Formula-fed babies may also get enough iron from iron-rich finger foods such as meat & poultry (especially beef and liver), winter squash, sweet potatoes, sea vegetables, greens, beans, egg yolks
Remember: Progress Not Perfection
If the process is going slow or you feel overwhelmed, you can always try a hybrid approach to feeding. And if your baby doesn’t seem ready, that’s ok too. Give it a week or two, then try again. After all, baby-led weaning doesn’t have to be all or nothing- so work with your physician and experiment with approaches to determine what best works for your family and lifestyle. It is all about being comfortable and enjoying the experience.